使用TLS增强docker的安全性

之前部署docker的时候都是没对docker的HTTP/socker接口进行加密。最近在线上部署的时候就得考虑这个。使用证书对docker进行加密主要参考官方的文档:
1. https://docs.docker.com/v1.13/engine/security/https/
2. https://github.com/docker/swarm/issues/341

docker engine配置TLS

主要注意做swarm cluster的时候 需要签发证书的时候subjectAltName里把本机的IP。生成证书的从网上找到的一个脚本做了修改,直接在里面把集群的IP都填进去,这样每个机器可以证书相同:


#!/bin/bash
# This script will help you setup Docker for TLS authentication.
# Run it passing in the arguement for the FQDN of your docker server
#
# For example:
#    ./create-docker-tls.sh myhost.docker.com
#
# The script will also create a profile.d (if it exists) entry
# which configures your docker client to use TLS
#
# We will also overwrite /etc/sysconfig/docker (again, if it exists) to configure the daemon.
# A backup will be created at /etc/sysconfig/docker.unixTimestamp
#
# MIT License applies to this script.  I don't accept any responsibility for
# damage you may cause using it.
#

set -e
STR=2048
if [ "$#" -gt 1 ]; then
  DOCKER_HOST1="$1"
  DOCKER_HOST2="$2"
else
  echo " => ERROR: You must specify the docker FQDN as the first arguement to this scripts! <="
  exit 1
fi

if [ "$USER" == "root" ]; then
  echo " => WARNING: You're running this script as root, therefore root will be configured to talk to docker"
  echo " => If you want to have other users query docker too, you'll need to symlink /root/.docker to /theuser/.docker"
fi

echo " => Using : $DOCKER_HOST1  You MUST connect to docker using this host!"

echo " => Ensuring config directory exists..."
cd ./cert

echo " => Verifying ca.srl"
if [ ! -f "ca.src" ]; then
  echo " => Creating ca.srl"
  echo 01 > ca.srl
fi

echo " => Generating CA key"
openssl genrsa \
  -out ca-key.pem $STR

echo " => Generating CA certificate"
openssl req \
  -new \
  -key ca-key.pem \
  -x509  \
  -sha256  \
  -days 3650 \
  -nodes \
  -subj "/CN=$" \
  -out ca.pem

echo " => Generating server key"
openssl genrsa \
  -out server-key.pem $STR

echo " => Generating server CSR"
openssl req \
  -subj "/CN=$DOCKER_HOST1" \
  -new \
  -sha256  \
  -key server-key.pem \
  -out server.csr

echo " => Signing server CSR with CA"
echo subjectAltName = "DNS:$DOCKER_HOST1,DNS:$DOCKER_HOST2,IP:127.0.0.1,IP:XXXXXX,IP:XXXXXX,IP:XXXXX,IP:XXXXX"  > extfile-server.cnf
openssl x509 \
  -req \
  -days 3650 \
   -sha256  \
  -in server.csr \
  -CA ca.pem \
  -CAkey ca-key.pem \
  -out server-cert.pem \
  -extfile extfile-server.cnf

echo " => Generating client key"
openssl genrsa \
  -out key.pem $STR

echo " => Generating client CSR"
openssl req \
  -subj "/CN=docker.client" \
  -new \
  -key key.pem \
  -out client.csr

echo " => Creating extended key usage"
echo extendedKeyUsage = clientAuth > extfile.cnf

echo " => Signing client CSR with CA"
openssl x509 \
  -req \
  -days 3650 \
  -sha256  \
  -in client.csr \
  -CA ca.pem \
  -CAkey ca-key.pem \
  -out cert.pem \
  -extfile extfile.cnf

if [ -d "/etc/profile.d" ]; then
  echo " => Creating profile.d/docker"
  sudo sh -c "echo '#!/bin/bash
export DOCKER_CERT_PATH=/home/$USER/.docker
export DOCKER_HOST=tcp://$DOCKER_HOST1:2376
export DOCKER_TLS_VERIFY=1' > /etc/profile.d/docker.sh"
  sudo chmod +x /etc/profile.d/docker.sh
  source /etc/profile.d/docker.sh
else
  echo " => WARNING: No /etc/profile.d directoy on your system."
  echo " =>   You will need to set the following environment variables before running the docker client:"
  echo " =>   DOCKER_HOST=tcp://$DOCKER_HOST1:2376"
  echo " =>   DOCKER_TLS_VERIFY=1"
fi

OPTIONS="--tlsverify --tlscacert=$HOME/.docker/ca.pem --tlscert=$HOME/.docker/server-cert.pem --tlskey=$HOME/.docker/server-key.pem -H=0.0.0.0:2376"
if [ -f "/etc/sysconfig/docker" ]; then
  echo " => Configuring /etc/sysconfig/docker"
  BACKUP="/etc/sysconfig/docker.$(date +"%s")"
  sudo mv /etc/sysconfig/docker $BACKUP
  sudo sh -c "echo '# The following line was added by ./create-certs docker TLS configuration script
OPTIONS="$OPTIONS"
# A backup of the old file is at $BACKUP.' >> /etc/sysconfig/docker"
  echo " => Backup file location: $BACKUP"
else
  echo " => WARNING: No /etc/sysconfig/docker file found on your system."
  echo " =>   You will need to configure your docker daemon with the following options:"
  echo " =>   $OPTIONS"
fi

export DOCKER_HOST=tcp://DOCKER_HOST:2376
export DOCKER_TLS_VERIFY=1
echo " => Done! You just need to restart docker for the changes to take effect"

附上docker.service


[Unit]
Description=Docker Application Container Engine
Documentation=http://docs.docker.com
After=network.target
Wants=docker-storage-setup.service

[Service]
Type=notify
EnvironmentFile=-/etc/sysconfig/docker
EnvironmentFile=-/etc/sysconfig/docker-storage
EnvironmentFile=-/etc/sysconfig/docker-network
Environment=GOTRACEBACK=crash
ExecStart=/usr/bin/dockerd  -H tcp://0.0.0.0:2375 -H unix:///var/run/docker.sock $OPTIONS   \
           --tlsverify --tlscacert=/etc/docker/cert/ca.pem --tlscert=/etc/docker/cert/server-cert.pem --tlskey=/etc/docker/cert/server-key.pem \
           --storage-driver=overlay \
           --cluster-store etcd://xxxxxx:2379/vxlan \
           --cluster-advertise=bond0:2375 \
          $DOCKER_STORAGE_OPTIONS \
          $DOCKER_NETWORK_OPTIONS \
          $ADD_REGISTRY \
          $BLOCK_REGISTRY \
          $INSECURE_REGISTRY
LimitNOFILE=1048576
LimitNPROC=1048576
LimitCORE=infinity
MountFlags=slave
TimeoutStartSec=1min
Restart=on-failure

[Install]
WantedBy=multi-user.target

swarm使用TLS

  1. 创建manage

sudo docker run --restart=always -v /etc/docker/cert/:/cert/ --name swarm-manage -d -p 8888:2375 swarm -l debug  manage  --tlsverify --tlscacert=/cert/ca.pem --tlscert=/cert/server-cert.pem --tlskey=/cert/server-key.pem  etcd://xxxxx:2379/swarm
  1. 启动agent

sudo docker run --restart=always --name swarm-agent -d  swarm join --addr=`hostname -i`:2375  etcd://xxxxx:2379/swarm

使用TLS连接swarm


$export DOCKER_HOST=tcp://xxxxx:8888 DOCKER_TLS_VERIFY=1
$docker version
Client:
 Version:      1.13.1
 API version:  1.24 (downgraded from 1.26)
 Go version:   go1.7.5
 Git commit:   092cba3
 Built:        Wed Feb  8 06:38:28 2017
 OS/Arch:      linux/amd64

Server:
 Version:      swarm/1.2.6
 API version:  1.22 (minimum version )
 Go version:   go1.7.1
 Git commit:   `git rev-parse --short HEAD`
 Built:        `date -u`
 OS/Arch:      linux/amd64
 Experimental: false
发表在 docker | 留下评论

利用BGP community黑洞路由

场景

在被攻击的时候,当入口无法承受巨大的流量时大家采用的方式是切换业务IP,然后把之前的IP做黑洞。
在与ISP对接时,每个ISP都有自己的BGP配置规范。接入方可以参考commuity属性对自己的路由做很多设置,包括MED,Localpref,AS-PATH 添加、路由定向宣告等,另外一个常用的就是黑洞某条路由

模拟拓扑


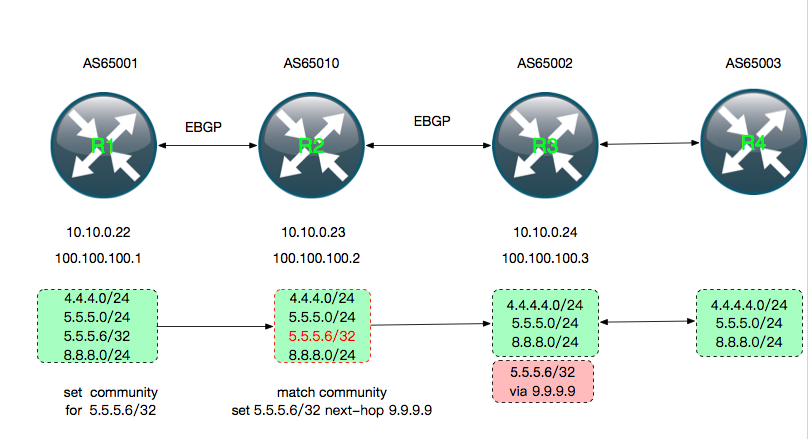
测试的环境有4个路由器:
– R1:企业路由器
– R2:ISP路由器
– R3:其他ISP的路由器
– R4: 其他ISP的客户

测试的方案

先把R1-R4的BGP调通,然后分别按下属操作:
1. R1上添加prefix-list把5.5.5.6/32这个明细路由直接发送给R2,并设置community属性4134:666(电信的黑洞属性).
2. R2上添加对community 4134:666的匹配操作


ip community-list  standard  cm-blackhole permit 4134:666
route-map out-filter permit 20
    match community cm-blackhole
    set local-preference 10
    set ip next-hop 172.20.20.1
    set community additive no-export
route-map out-filter permit 30
    set local-preference 30
    set metric 30

可以观察在R1-R4上的路由情况:

R1 路由


094846cab3a9# show ip bgp
BGP table version is 0, local router ID is 10.10.0.22
Status codes: s suppressed, d damped, h history, * valid, > best, = multipath,
              i internal, r RIB-failure, S Stale, R Removed
Origin codes: i - IGP, e - EGP, ? - incomplete

   Network          Next Hop            Metric LocPrf Weight Path
*> 4.4.4.0/24       0.0.0.0                121          32768 ?
*> 5.5.5.0/24       0.0.0.0                121          32768 ?
*> 5.5.5.6/32       0.0.0.0                121          32768 ?
*> 6.6.6.0/24       0.0.0.0                121          32768 ?
*> 8.8.8.0/24       0.0.0.0                121          32768 ?
*  10.10.0.0/16     10.10.0.23             121              0 65010 ?
*>                  0.0.0.0                121          32768 ?
*> 100.100.100.1/32 0.0.0.0                121          32768 ?
*> 100.100.100.2/32 10.10.0.23             121              0 65010 ?
*> 100.100.100.3/32 10.10.0.23                             0 65010 65002 ?
*> 100.100.100.4/32 10.10.0.23                             0 65010 65002 65003 ?
*  172.18.0.0       10.10.0.23             121              0 65010 ?
*>                  0.0.0.0                121          32768 ?

Displayed  11 out of 13 total prefixes
094846cab3a9# show ip bgp neighbors 10.10.0.23 advertised-routes
BGP table version is 0, local router ID is 10.10.0.22
Status codes: s suppressed, d damped, h history, * valid, > best, = multipath,
              i internal, r RIB-failure, S Stale, R Removed
Origin codes: i - IGP, e - EGP, ? - incomplete

   Network          Next Hop            Metric LocPrf Weight Path
*> 4.4.4.0/24       10.10.0.22             121          32768 ?
*> 5.5.5.0/24       10.10.0.22             121          32768 ?
*> 5.5.5.6/32       10.10.0.22             121          32768 ?
*> 8.8.8.0/24       10.10.0.22             121          32768 ?
*> 100.100.100.1/32 10.10.0.22             121          32768 ?

R2路由


05fe39a5b056# show ip bgp neighbors 10.10.0.22 routes
BGP table version is 0, local router ID is 10.10.0.23
Status codes: s suppressed, d damped, h history, * valid, > best, = multipath,
              i internal, r RIB-failure, S Stale, R Removed
Origin codes: i - IGP, e - EGP, ? - incomplete

   Network          Next Hop            Metric LocPrf Weight Path
*> 4.4.4.0/24       10.10.0.22             110              0 65001 65001 ?
*> 5.5.5.0/24       10.10.0.22             110              0 65001 65001 ?
*> 5.5.5.6/32       10.10.0.22             110              0 65001 65001 ?
*> 8.8.8.0/24       10.10.0.22             100     250       0 65010 65001 ?
*> 100.100.100.1/32 10.10.0.22             100     250       0 65010 65001 ?

Displayed  5 out of 12 total prefixes
05fe39a5b056# show ip bgp 5.5.5.6/32
BGP routing table entry for 5.5.5.6/32
Paths: (1 available, best #1, table Default-IP-Routing-Table)
  Advertised to non peer-group peers:
  10.10.0.24
  65001 65001
    10.10.0.22 from 10.10.0.22 (10.10.0.22)
      Origin incomplete, metric 110, localpref 100, valid, external, best
      Community: 4134:666
      Last update: Tue Mar 14 07:17:16 2017

可以看到R2收到的 5.5.5.6/32路由具有4134:666这个community属性。
然后再看看R3的

R3 路由


cc6a781cbc3a# show ip bgp neighbors  10.10.0.23 routes
BGP table version is 0, local router ID is 10.10.0.24
Status codes: s suppressed, d damped, h history, * valid, > best, = multipath,
              i internal, r RIB-failure, S Stale, R Removed
Origin codes: i - IGP, e - EGP, ? - incomplete

   Network          Next Hop            Metric LocPrf Weight Path
*> 4.4.4.0/24       10.10.0.23              30             0 65010 65001 65001 ?
*> 5.5.5.0/24       10.10.0.23              30             0 65010 65001 65001 ?
*> 5.5.5.6/32       172.20.20.1                            0 65010 65001 65001 ?
*> 8.8.8.0/24       10.10.0.23              30             0 65010 65010 65001 ?
*  10.10.0.0/16     10.10.0.23              30             0 65010 ?
*> 100.100.100.1/32 10.10.0.23              30             0 65010 65010 65001 ?
*> 100.100.100.2/32 10.10.0.23              30             0 65010 ?
*  172.18.0.0       10.10.0.23              30             0 65010 ?

Displayed  8 out of 14 total prefixes
cc6a781cbc3a# show ip bgp 5.5.5.6/32
BGP routing table entry for 5.5.5.6/32
Paths: (1 available, best #1, table Default-IP-Routing-Table, not advertised to EBGP peer)
  Not advertised to any peer
  65010 65001 65001
    172.20.20.1 from 10.10.0.23 (10.10.0.23)
      Origin incomplete, localpref 100, valid, external, best
      Community: 4134:666 no-export
      Last update: Tue Mar 14 07:17:44 2017

可以看到R2把我们想要黑洞的路由5.5.5.6/32转发给R3时,按照需求标记了 no-export属性,并把路由的下一条改到了不存的一个IP 172.20.20.1(quagga上不能直接写127.0.0.1,会导致邻居无法建立)。

R4路由


db71d04826e4# show ip bgp neighbors 10.10.0.24 routes
BGP table version is 0, local router ID is 10.10.0.25
Status codes: s suppressed, d damped, h history, * valid, > best, = multipath,
              i internal, r RIB-failure, S Stale, R Removed
Origin codes: i - IGP, e - EGP, ? - incomplete

   Network          Next Hop            Metric LocPrf Weight Path
*> 4.4.4.0/24       10.10.0.24                             0 65002 65010 65001 65001 ?
*> 5.5.5.0/24       10.10.0.24                             0 65002 65010 65001 65001 ?
*> 8.8.8.0/24       10.10.0.24                             0 65002 65010 65010 65001 ?
*  10.10.0.0/16     10.10.0.24             121              0 65002 ?
*> 100.100.100.1/32 10.10.0.24                             0 65002 65010 65010 65001 ?
*> 100.100.100.2/32 10.10.0.24                             0 65002 65010 ?
*> 100.100.100.3/32 10.10.0.24             121              0 65002 ?
*  172.18.0.0       10.10.0.24             121              0 65002 ?

从上面可以看到R4上完全没有5.5.5.6/32的路由,虽然/24的路由指向了R3,但是因为R3本地5.5.5.6/32的路由被指向了一个无效的IP,因此从R4访问被黑洞的IP 5.5.5.6/32的流量就止于R3。在实际的运营商网络中,一般会在路由器上把这个 172.20.20.1 设置为NULL0,并丢弃其所有的流量。

完整配置

附上完整的配置:


R1  
----
log file /var/log/quagga/bgpd.log
password bgp
router bgp 65001
 bgp router-id 10.10.0.22
 redistribute connected metric 121
 neighbor 10.10.0.23 remote-as 65010
 neighbor 10.10.0.23 password DOCKER
 neighbor 10.10.0.23 ebgp-multihop 255
 neighbor 10.10.0.23 next-hop-self
 neighbor 10.10.0.23 route-map out-filter  out
 distance bgp 250 200 150
!
!
ip prefix-list blackhole seq 5 permit 5.5.5.6/32
!ip prefix-list blackhole seq 10 permit 5.5.5.0/24
ip prefix-list r1-out seq 5 permit 4.4.4.0/24
ip prefix-list r1-out seq 6 permit 5.5.5.0/24
ip prefix-list r1-out seq 11 permit 8.8.8.0/24
ip prefix-list r1-out seq 15 permit 100.100.100.0/23 ge 24
ip prefix-list r1-out seq 25 permit 10.0.0.0/8
ip prefix-list r1-out seq 50 deny any
!
route-map out-filter permit 5
 match ip address prefix-list  blackhole
 set community 4134:666

route-map out-filter permit 10
 match ip address prefix-list  r1-out

!

R2
---

log file /var/log/quagga/bgpd.log
password bgp
router bgp 65010
 distance bgp 250  200 150
 bgp router-id 10.10.0.23
 neighbor 10.10.0.22 remote-as  65001
 neighbor 10.10.0.24 remote-as  65002
 neighbor 10.10.0.22 password DOCKER
 neighbor 10.10.0.24 password DOCKER
 neighbor 10.10.0.22 route-map in-filter in
 neighbor 10.10.0.24 route-map out-filter out
 neighbor 10.10.0.22 ebgp-multihop
 neighbor 10.10.0.24 ebgp-multihop
 neighbor 10.10.0.22 next-hop-self
 neighbor 10.10.0.24 next-hop-self
 redistribute connected  metric 121
 access-list all permit any
ip prefix-list from-r1-in seq 5 permit 4.4.4.0/24
ip prefix-list from-r1-in seq 6 permit 5.5.5.0/24 le 32
!ip prefix-list from-r1-in seq 7 permit 8.8.8.0/24
!ip prefix-list from-r1-in seq 15 permit 100.100.100.0/24 le 32
ip prefix-list from-r1-in seq 20 permit 10.0.0.0/8
ip prefix-list from-r1-in seq 50 deny any

ip prefix-list from-r1-in-t1 seq 7 permit 8.8.8.0/24 le 32
ip prefix-list from-r1-in-t1 seq 15 permit 100.100.100.0/24 le 32

ip prefix-list to-r3 seq 5 permit any


ip community-list  standard  cm-blackhole permit 4134:666
!ip community-list  standard  cm-blackhole permit

route-map out-filter permit 20
 match community cm-blackhole
 set local-preference 10
 set ip next-hop 172.20.20.1
 set community additive no-export
route-map out-filter permit 30
 set local-preference 30
 set metric 30

route-map in-filter permit 5
  match ip address prefix-list from-r1-in-t1
   set as-path prepend 65010
   set metric 100
   set local-preference 250
   set community 65002:4134

route-map in-filter permit 10
 match ip address prefix-list from-r1-in
 set as-path prepend 65001
 set metric 110

 R3
 ---
 log file /var/log/quagga/bgpd.log
password bgp
router bgp 65002
 distance bgp 250  200 150
 bgp router-id 10.10.0.24
 neighbor 10.10.0.23 remote-as  65010
 neighbor 10.10.0.23 password DOCKER
 neighbor 10.10.0.23 ebgp-multihop
 neighbor 10.10.0.23 next-hop-self
 neighbor 10.10.0.25 remote-as  65003
 neighbor 10.10.0.25 password DOCKER
 neighbor 10.10.0.25 ebgp-multihop
 neighbor 10.10.0.25 next-hop-self
 redistribute connected  metric 121
 access-list all permit any


 R4
 ---
 log file /var/log/quagga/bgpd.log
password bgp
router bgp 65003
 distance bgp 250  200 150
 bgp router-id  10.10.0.25
 neighbor  10.10.0.24 remote-as  65002
 neighbor  10.10.0.24 password DOCKER
 redistribute connected  metric 121
 access-list all permit any
发表在 System | 留下评论

BGP路由重分发过滤

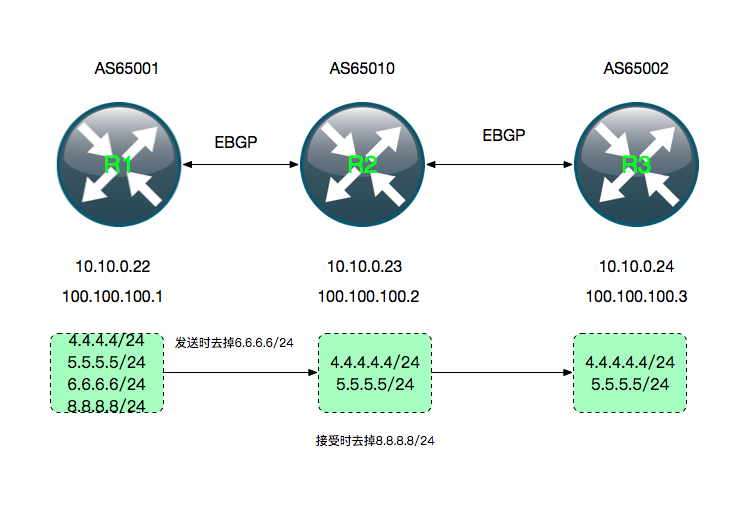
以下图为例

R1 配置

在R1给R2发送路由时,把6.6.6.0/24去掉。对应的配置为


log file /var/log/quagga/bgpd.log
password bgp
router bgp 65001
 distance bgp 250  200 150
 bgp router-id 10.10.0.22
 neighbor 10.10.0.23 remote-as  65010
 neighbor 10.10.0.23 password DOCKER
 neighbor 10.10.0.23 ebgp-multihop
 neighbor 10.10.0.23 prefix-list r1-out out
 neighbor 10.10.0.23 next-hop-self
 redistribute connected  metric 121
 access-list all permit any
ip prefix-list r1-out seq 5 permit 4.4.4.0/24
ip prefix-list r1-out seq 6 permit 5.5.5.0/24
!ip prefix-list r1-out seq 10 permit 6.6.6.0/24
ip prefix-list r1-out seq 11 permit 8.8.8.0/24
ip prefix-list r1-out seq 15 permit 100.100.100.0/23 ge 24 le 32
ip prefix-list r1-out seq 25 permit 10.0.0.0/8
ip prefix-list r1-out seq 50 deny any

可以看到R1给R2发送的路由中把本地的 6.6.6.6去掉了


 094846cab3a9# show ip bgp neighbors 10.10.0.23 advertised-routes
BGP table version is 0, local router ID is 10.10.0.22
Status codes: s suppressed, d damped, h history, * valid, > best, = multipath,
              i internal, r RIB-failure, S Stale, R Removed
Origin codes: i - IGP, e - EGP, ? - incomplete
   Network          Next Hop            Metric LocPrf Weight Path
*> 4.4.4.0/24       10.10.0.22             121          32768 ?
*> 5.5.5.0/24       10.10.0.22             121          32768 ?
*> 8.8.8.0/24       10.10.0.22             121          32768 ?
*> 100.100.100.1/32 10.10.0.22             121          32768 ?
Total number of prefixes 4

R2配置


log file /var/log/quagga/bgpd.log
password bgp
router bgp 65010
 distance bgp 250  200 150
 bgp router-id 10.10.0.23
 neighbor 10.10.0.22 remote-as  65001
 neighbor 10.10.0.24 remote-as  65002
 neighbor 10.10.0.22 password DOCKER
 neighbor 10.10.0.24 password DOCKER
 neighbor 10.10.0.22 prefix-list from-r1-in in
 neighbor 10.10.0.22 ebgp-multihop
 neighbor 10.10.0.24 ebgp-multihop
 neighbor 10.10.0.22 next-hop-self
 neighbor 10.10.0.24 next-hop-self
 redistribute connected  metric 121
 access-list all permit any
ip prefix-list from-r1-in seq 5 permit 4.4.4.0/24
ip prefix-list from-r1-in seq 6 permit 5.5.5.0/24
!ip prefix-list from-r1-in seq 11 permit 8.8.8.0/24
ip prefix-list from-r1-in seq 15 permit 100.100.100.0/24 le 32
ip prefix-list from-r1-in seq 20 permit 10.0.0.0/8
ip prefix-list from-r1-in seq 50 deny any

R2 上查看从R1接受到的路由无8.8.8.8


05fe39a5b056# show ip bgp neighbors 10.10.0.22 routes
BGP table version is 0, local router ID is 10.10.0.23
Status codes: s suppressed, d damped, h history, * valid, > best, = multipath,
              i internal, r RIB-failure, S Stale, R Removed
Origin codes: i - IGP, e - EGP, ? - incomplete
   Network          Next Hop            Metric LocPrf Weight Path
*> 4.4.4.0/24       10.10.0.22             121              0 65001 ?
*> 5.5.5.0/24       10.10.0.22             121              0 65001 ?
*> 100.100.100.1/32 10.10.0.22             121              0 65001 ?
Displayed  3 out of 9 total prefixes

R2如果想用route-map做控制,相应的配置如下


log file /var/log/quagga/bgpd.log
password bgp
router bgp 65010
 distance bgp 250  200 150
 bgp router-id 10.10.0.23
 neighbor 10.10.0.22 remote-as  65001
 neighbor 10.10.0.24 remote-as  65002
 neighbor 10.10.0.22 password DOCKER
 neighbor 10.10.0.24 password DOCKER
 neighbor 10.10.0.22 route-map myfilter in
 neighbor 10.10.0.22 ebgp-multihop
 neighbor 10.10.0.24 ebgp-multihop
 neighbor 10.10.0.22 next-hop-self
 neighbor 10.10.0.24 next-hop-self
 redistribute connected  metric 121
 access-list all permit any
ip prefix-list from-r1-in seq 5 permit 4.4.4.0/24
ip prefix-list from-r1-in seq 6 permit 5.5.5.0/24
ip prefix-list from-r1-in seq 15 permit 100.100.100.0/24 le 32
ip prefix-list from-r1-in seq 20 permit 10.0.0.0/8
##因为route-map是默认deny的,未匹配的都被deny了。
route-map myfilter permit 10
 match ip address prefix-list from-r1-in

R3配置


log file /var/log/quagga/bgpd.log
password bgp
router bgp 65002
 distance bgp 250  200 150
 bgp router-id 10.10.0.24
 neighbor 10.10.0.23 remote-as  65010
 neighbor 10.10.0.23 password DOCKER
 neighbor 10.10.0.23 ebgp-multihop
 neighbor 10.10.0.23 next-hop-self
 redistribute connected  metric 121
 access-list all permit any
发表在 net | 标签为 | 留下评论

bind 9.11 ECS基本测试

9.11 中增加了多EDNS Client Subnet(ECS)的支持。但是目前网上都还没有相关的测试,仅仅在邮件列表有点没配置成功的咨询。
在9.11中需要开启ECS需要在编译的时候指定Geoip


yum install -y  GeoIP
./configure --with-geoip=--with-geoip=/usr/share/GeoIP/

目前bind的ACL中是把ECS 带的Client地址作为一个独立的特征做匹配


单ECS本身还是做IP地址匹配,非常容易与现有的地址匹配混淆。最开始以为可以这样搞


acl zone1 { ecs 10.0.0.0/8 ;  10.0.0.0/8;  };
acl zone2 { ecs 172.0.0.0/8; 172.0.0.0/8; };
view  "zone1" { match-clients  {zone1;}; zone "test.org" { type master; file "zone/test.org" ;}; };
view  "zone2" { match-clients  {zone2;}; zone "test.org" { type master; file "zone2/test.org" ;}; };

发现走10.0.0.0/8内的源地址带172.0.0.0/8的subnet时始终命中zone1,无法到达预期的效果。目前测试OK的配置只能是把ECS的ACL做独立的view匹配。
而且鉴于bind acl并非是最精确匹配,只是线性匹配,配置的时候必须要把ecs view写在最前面,否则即使请求带了ECS OPTION,也会因为源地址先匹配到其他view而达不到效果。。


acl zone1 { ecs 10.0.0.0/8;  10.0.0.0/8;  };
acl zone2 { ecs 172.0.0.0/8;172.0.0.0/8; };
acl ecs-zone1 { ecs 10.0.0.0/8;  };
acl ecs-zone2 { ecs 172.0.0.0/8;};
view  "ecs-zone1" { match-clients  {ecs-zone1;}; zone "test.org" { type master; file "ecszone/test.org" ;}; };
view  "ecs-zone2" { match-clients  {ecs-zone2;}; zone "test.org" { type master; file "ecszone2/test.org" ;}; };
view  "zone1" { match-clients  {zone1;}; zone "test.org" { type master; file "zone/test.org" ;}; };
view  "zone2" { match-clients  {zone2;}; zone "test.org" { type master; file "zone2/test.org" ;}; };

实际测试的命令


dig @10.10.0.15 test100.test.org
dig @172.18.0.6 test100.test.org
dig @10.10.0.15 test100.test.org  +subnet=172.1.1.1/24
dig @10.10.0.15 test100.test.org  +subnet=10.1.1.1/24
dig @172.18.0.6 test100.test.org  +subnet=10.1.1.1/24
dig @172.18.0.6 test100.test.org  +subnet=172.1.1.1/24

对应日志中显示的view 匹配


09-Mar-2017 08:36:59.784 queries: client @0x7f83d40a9780 10.10.0.15#43153 (test100.test.org): view zone1: query: test100.test.org IN A +E(0)K (10.10.0.15)
09-Mar-2017 08:37:03.387 queries: client @0x7f83d4003960 172.18.0.6#35845 (test100.test.org): view zone2: query: test100.test.org IN A +E(0)K (172.18.0.6)
09-Mar-2017 08:37:09.289 queries: client @0x7f83d40a9780 10.10.0.15#59444 (test100.test.org): view ecs-zone2: query: test100.test.org IN A +E(0)K (10.10.0.15)
09-Mar-2017 08:37:16.402 queries: client @0x7f83d40a9780 10.10.0.15#47162 (test100.test.org): view ecs-zone1: query: test100.test.org IN A +E(0)K (10.10.0.15)
09-Mar-2017 08:37:23.009 queries: client @0x7f83d4003960 172.18.0.6#51519 (test100.test.org): view ecs-zone1: query: test100.test.org IN A +E(0)K (172.18.0.6)
09-Mar-2017 08:37:34.102 queries: client @0x7f83d4003960 172.18.0.6#39007 (test100.test.org): view ecs-zone2: query: test100.test.org IN A +E(0)K (172.18.0.6)

isc在bind 9.11的开发分支中对目前ECS的支持有特殊的说明


Miscellaneous Notes

Authoritative server support for the EDNS Client Subnet option (ECS), introduced in BIND 9.11.0, was based on an early version of the specification, and is now known to have incompatibilities with other ECS implementations. It is also inefficient, requiring a separate view for each answer, and is unable to correct for overlapping subnets in the configuration. It is intended for testing purposes but is not recommended for for production use. This was not made sufficiently clear in the documentation at the time of release.

参考:
1. bind各个版本的特性矩阵:https://kb.isc.org/article/AA-01310/109/BIND9-Significant-Features-Matrix.html
2. https://ftp.isc.org/isc/bind9/9.11.1rc1/RELEASE-NOTES-bind-9.11.1rc1.html

发表在 dns | 2条评论

wordpress垃圾评论清理

最近开启了评论,存在大量机器自动填的垃圾评论。网上找了下一些验证插件,要么是使用还得把评论发到其服务端过滤,要么是像myQaptcha这样的太久不更新早已不能使用。
网上找了个方案是直接把wp-comments-post.php文件改一下名字,先试试效果吧。


mv wp-comments-post.php wp-comments-post-gnuer.php
sed -i 's/wp-comments-post.php/wp-comments-post-gnuer.php/g' $(grep wp-comments-post.php  * -R|cut -d: -f1)
发表在 杂谈 | 留下评论

全球BGP Looking Glass

有几个场景需要使用BGP Looking Glass。
1. 确认某个区域/ISP的用户访问自己的服务时走的路线。
2. 在使用自己的BGP网络对外宣告地址时,需要看看自己的ISP是否真的接受了对应的路由。

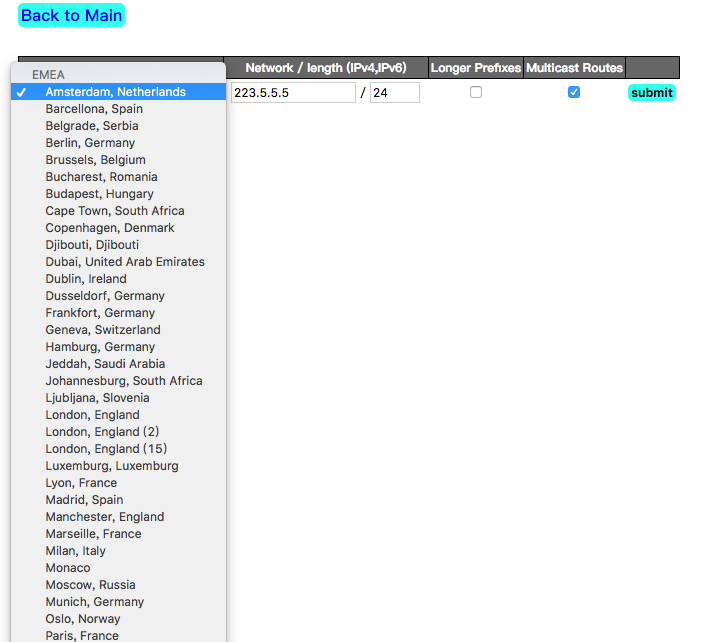
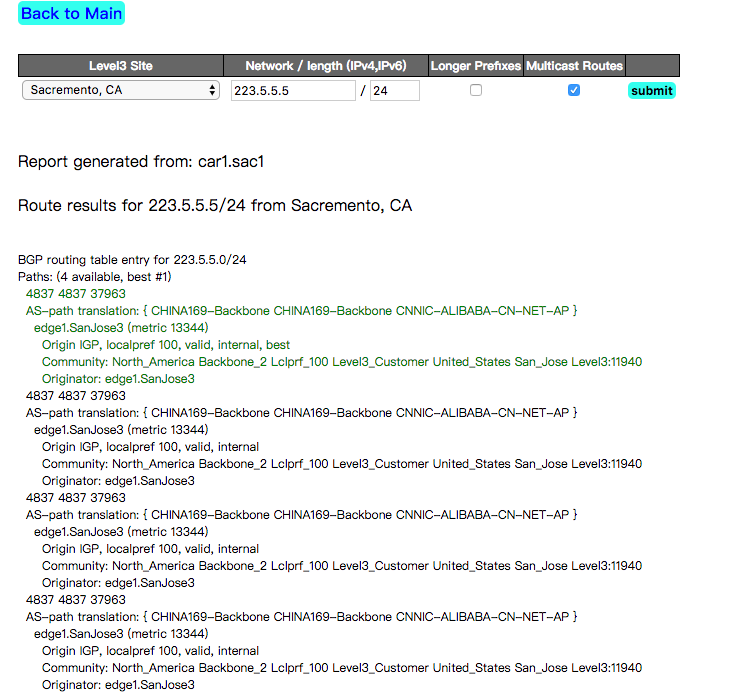
目前国外主流的Tier1 /Tier2都提供了Looking Glass可以查看路由。网上有整理好的looking glass列表 http://www.bgplookingglass.com/。

以Level 3的为例,可以打开http://lg.level3.net/bgp/lg_bgp_main.php。 输入自己要看的网段后即可看到

发表在 net | 标签为 | 一条评论

使用anycast抵御DDOS的方案

前面有多次介绍Anycast的相关内容。这几年伴随每次cloudflare被大规模DDOS,Anycast被越来越多的人关注。
根据cloudflare的blog和公开的PPT,大致可以猜出其CDN的部署模式是下图

因为Cloudflare单个节点基本都在300G以上,全球就几十个节点。因此一般几百G的DDOS在网络层对Cloudflare无法构成威胁。cloudflare的风险点主要还是应用层的防护性能。
部署TCP的anycast时,需要注意的点:
1. 交换机的hash规则配置,节点内单个机器维护时hash结果会变,会引起闪断。这对于一般的HTTP服务影响不大,但是如果想改善体验,可以在应用服务器上同步好TCP session。
2. 隐藏自己的网络接口地址,不然traceroute找到中间网络接口地址,攻击者攻击中间链路是没法阻止的。
3. 各服务使用独立的anycast 地址,各服务异常时不会相互影响,服务异常时能自动撤销路由,但是注意得设置好quota,不热一些异常可能导致所有节点的路由都撤销了。
4. 确保global节点的具备足够的接入带宽,某些区域性的攻击过大,如果global节点能抗住可以把流量攻击引入到global节点处理。

发表在 net | 留下评论

BGP路由反射

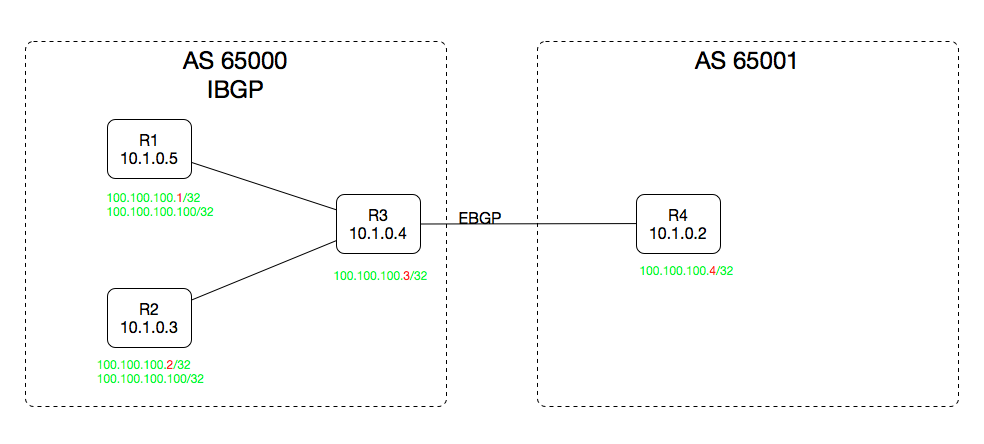
接着上一篇文章中的图

要想IBGP内各路由器内都有完整的路由信息,可以做的方案:
1. 做full mesh,也就是改一下R1/R2的配置,将对方做peer。
2. 将R3设置为路由反射器(Route-Reflector)
3. 使用BGP联盟,把内部各路由器划到不同分子AS。

路由反射的配置比较简单,R1/R2的配置不变,R3的配置只需要添加一行


log file /var/log/quagga/zebra.log
log file /var/log/quagga/bgpd.log
!
password bgp
!
interface eth0
 ipv6 nd suppress-ra
 link-detect
!
interface eth1
 ipv6 nd suppress-ra
 no link-detect
!
interface lo
 no link-detect
!
router bgp 65000
 bgp router-id 10.1.0.4
 redistribute connected metric 121
 neighbor IBGP peer-group
 neighbor IBGP remote-as 65000
 neighbor IBGP password DOCKER
 neighbor IBGP route-reflector-client
 neighbor 10.1.0.2 remote-as 65001
 neighbor 10.1.0.2 password DOCKER
 neighbor 10.1.0.2 ebgp-multihop 255
 neighbor 10.1.0.3 peer-group IBGP
 neighbor 10.1.0.5 peer-group IBGP
 distance bgp 250 200 150
 exit
!
access-list all permit any
!
ip forwarding
ipv6 forwarding
!
line vty
!
end

其中neighbor IBGP route-reflector-client这个行将IBGP这个peer-group设置为了反射的client,因此R3可以在R1/R2之间重分发路由。

注意点

  1. 配置了路由反射器后,不要设置ibg的 maximum-paths 大于1,否则在域内各router宣告相同的地址时,RR为避免环路只会保留一个为邻居。
发表在 net | 标签为 | 留下评论

使用quagga配置BGP

BGP相对OSPF来说在骨干网络上使用的比较多,是目前域间路由协议的事实标准。通常在服务器上直接使用BGP的场景不多(内部网络大家都倾向使用OSPF这类IGP)。
其实BGP的配置也很简单,从以下的拓扑来看4个机器的BGP配置

各路由配置文件

R1 配置


!
log file /var/log/quagga/zebra.log
log file /var/log/quagga/bgpd.log
!
password bgp
!
interface eth0
 ipv6 nd suppress-ra
 link-detect
!
interface eth1
 ipv6 nd suppress-ra
 no link-detect
!
interface lo
 no link-detect
!
interface tunl0
 ipv6 nd suppress-ra
 no link-detect
!
router bgp 65000
 bgp router-id 10.1.0.5
 redistribute connected metric 121
 neighbor 10.1.0.4 remote-as 65000
 neighbor 10.1.0.4 password DOCKER
 neighbor 10.1.0.4 next-hop-self
 distance bgp 250 200 150
 exit
!
access-list all permit any
!
ip forwarding
ipv6 forwarding
!
line vty
!
end

R2 配置


log file /var/log/quagga/zebra.log
log file /var/log/quagga/bgpd.log
!
password bgp
!
interface eth0
 ipv6 nd suppress-ra
 link-detect
!
interface eth1
 ipv6 nd suppress-ra
 no link-detect
!
interface lo
 no link-detect
!
interface tunl0
 ipv6 nd suppress-ra
 no link-detect
!
router bgp 65000
 bgp router-id 10.1.0.3
 redistribute connected metric 121
 neighbor 10.1.0.4 remote-as 65000
 neighbor 10.1.0.4 password DOCKER
 neighbor 10.1.0.4 next-hop-self
 distance bgp 250 200 150
 exit
!
access-list all permit any
!
ip forwarding
ipv6 forwarding
!
line vty
!
end

R3 配置


log file /var/log/quagga/zebra.log
log file /var/log/quagga/bgpd.log
!
password bgp
!
interface eth0
 ipv6 nd suppress-ra
 link-detect
!
interface eth1
 ipv6 nd suppress-ra
 no link-detect
!
interface lo
 no link-detect
!
router bgp 65000
 bgp router-id 10.1.0.4
 redistribute connected metric 121
 neighbor IBGP peer-group
 neighbor IBGP remote-as 65000
 neighbor IBGP password DOCKER
 neighbor 10.1.0.2 remote-as 65001
 neighbor 10.1.0.2 password DOCKER
 neighbor 10.1.0.2 ebgp-multihop 255
 neighbor 10.1.0.3 peer-group IBGP
 neighbor 10.1.0.5 peer-group IBGP
 maximum-paths ibgp 32
 distance bgp 250 200 150
 exit
!
access-list all permit any
!
ip forwarding
ipv6 forwarding
!
line vty
!
end

R4配置


log file /var/log/quagga/zebra.log
log file /var/log/quagga/bgpd.log
!
password bgp
!
interface eth0
 ipv6 nd suppress-ra
 link-detect
!
interface eth1
 ipv6 nd suppress-ra
 no link-detect
!
interface lo
 no link-detect
!
interface tunl0
 ipv6 nd suppress-ra
 no link-detect
!
router bgp 65001
 bgp router-id 10.1.0.2
 redistribute connected metric 121
 neighbor 10.1.0.4 remote-as 65000
 neighbor 10.1.0.4 password DOCKER
 neighbor 10.1.0.4 next-hop-self
 distance bgp 250 200 150
 exit
!
access-list all permit any
!
ip forwarding
ipv6 forwarding
!
line vty
!
end

BGP邻居状态

R3与其他节点都是邻居,因此以R3的为例


c78df8a1d9d5# show ip bgp neighbors
BGP neighbor is 10.1.0.2, remote AS 65001, local AS 65000, external link
  BGP version 4, remote router ID 10.1.0.2
  BGP state = Established, up for 01:33:01
  Last read 00:00:01, hold time is 180, keepalive interval is 60 seconds
  Neighbor capabilities:
    4 Byte AS: advertised and received
    Route refresh: advertised and received(old & new)
    Address family IPv4 Unicast: advertised and received
    Graceful Restart Capabilty: advertised and received
      Remote Restart timer is 120 seconds
      Address families by peer:
        none
  Graceful restart informations:
    End-of-RIB send: IPv4 Unicast
    End-of-RIB received: IPv4 Unicast
  Message statistics:
    Inq depth is 0
    Outq depth is 0
                         Sent       Rcvd
    Opens:                  1          1
    Notifications:          0          0
    Updates:                5          2
    Keepalives:            95         94
    Route Refresh:          0          0
    Capability:             0          0
    Total:                101         97
  Minimum time between advertisement runs is 30 seconds

 For address family: IPv4 Unicast
  Community attribute sent to this neighbor(both)
  3 accepted prefixes

  Connections established 1; dropped 0
  Last reset never
  External BGP neighbor may be up to 255 hops away.
Local host: 10.1.0.4, Local port: 36686
Foreign host: 10.1.0.2, Foreign port: 179
Nexthop: 10.1.0.4
Nexthop global: ::
Nexthop local: ::
BGP connection: non shared network
Read thread: on  Write thread: off

BGP neighbor is 10.1.0.3, remote AS 65000, local AS 65000, internal link
 Member of peer-group IBGP for session parameters
  BGP version 4, remote router ID 10.1.0.3
  BGP state = Established, up for 01:32:57
  Last read 00:00:57, hold time is 180, keepalive interval is 60 seconds
  Neighbor capabilities:
    4 Byte AS: advertised and received
    Route refresh: advertised and received(old & new)
    Address family IPv4 Unicast: advertised and received
    Graceful Restart Capabilty: advertised and received
      Remote Restart timer is 120 seconds
      Address families by peer:
        none
  Graceful restart informations:
    End-of-RIB send: IPv4 Unicast
    End-of-RIB received: IPv4 Unicast
  Message statistics:
    Inq depth is 0
    Outq depth is 0
                         Sent       Rcvd
    Opens:                  2          0
    Notifications:          0          0
    Updates:                3          2
    Keepalives:            94         93
    Route Refresh:          0          0
    Capability:             0          0
    Total:                 99         95
  Minimum time between advertisement runs is 5 seconds

 For address family: IPv4 Unicast
  IBGP peer-group member
  Community attribute sent to this neighbor(both)
  4 accepted prefixes

  Connections established 1; dropped 0
  Last reset never
Local host: 10.1.0.4, Local port: 179
Foreign host: 10.1.0.3, Foreign port: 43991
Nexthop: 10.1.0.4
Nexthop global: ::
Nexthop local: ::
BGP connection: non shared network
Read thread: on  Write thread: off

BGP neighbor is 10.1.0.5, remote AS 65000, local AS 65000, internal link
 Member of peer-group IBGP for session parameters
  BGP version 4, remote router ID 10.1.0.5
  BGP state = Established, up for 01:32:56
  Last read 00:00:56, hold time is 180, keepalive interval is 60 seconds
  Neighbor capabilities:
    4 Byte AS: advertised and received
    Route refresh: advertised and received(old & new)
    Address family IPv4 Unicast: advertised and received
    Graceful Restart Capabilty: advertised and received
      Remote Restart timer is 120 seconds
      Address families by peer:
        none
  Graceful restart informations:
    End-of-RIB send: IPv4 Unicast
    End-of-RIB received: IPv4 Unicast
  Message statistics:
    Inq depth is 0
    Outq depth is 0
                         Sent       Rcvd
    Opens:                  2          0
    Notifications:          0          0
    Updates:                3          2
    Keepalives:            94         93
    Route Refresh:          0          0
    Capability:             0          0
    Total:                 99         95
  Minimum time between advertisement runs is 5 seconds

 For address family: IPv4 Unicast
  IBGP peer-group member
  Community attribute sent to this neighbor(both)
  4 accepted prefixes

  Connections established 1; dropped 0
  Last reset never
Local host: 10.1.0.4, Local port: 179
Foreign host: 10.1.0.5, Foreign port: 42140
Nexthop: 10.1.0.4
Nexthop global: ::
Nexthop local: ::
BGP connection: non shared network
Read thread: on  Write thread: off

各节点上的路由表

  1. R3上ECMP路由

default via 172.19.0.1 dev eth1
10.1.0.0/16 dev eth0  proto kernel  scope link  src 10.1.0.4
100.100.100.1 via 10.1.0.5 dev eth0  proto zebra  metric 20
100.100.100.2 via 10.1.0.3 dev eth0  proto zebra  metric 20
100.100.100.4 via 10.1.0.2 dev eth0  proto zebra  metric 20
100.100.100.100  proto zebra  metric 20
        nexthop via 10.1.0.5  dev eth0 weight 1
        nexthop via 10.1.0.3  dev eth0 weight 1
172.18.0.0/16 via 10.1.0.5 dev eth0  proto zebra  metric 20
172.19.0.0/16 dev eth1  proto kernel  scope link  src 172.19.0.2

其他说明

  1. 本测试中用了peer group,主要是IBGP内多个邻居测试比较简单一些。
  2. quagga内默认IBGP的路径最大是1,通过maximum-paths ibgp 32改了一下。
  3. 本案例中R1和R2是不通的,因为IBGP内未做特殊设置(BGP反射或者BGP联盟)是不会接受其他IBGP邻居传递的路由。
  4. 要想能从R4访问R1/R2宣告的100.100.100.100/32需要注意linux的kernel版本。。3.10的版本是按每个包单独转发,是建立不了TCP连接的。我测试时升级到了4.4.

参考文档

  1. https://lwn.net/Articles/656111/
发表在 net | 留下评论

TCP Over IP Anycast适用场景

Anycast在国内应用现状

Anycast本身是个古老的技术,但是在国内互联网公司内都使用的不多。其原因如下:
1. 普通的互联网服务的高可用可以通过DNS层切换,业务恢复时间最短可以控制在5分钟内,满足国内绝大部分企业的需求了。
2. Anycast实施的网络接入要求比较高,国内企业具备有自己BGP网络的屈指可数。在公有云业务发展起来之前,国内大规模使用BGP网络为主营业务提供服务除了阿里之外别无二家,鹅厂和熊厂长期以来还是用智能DNS配合多线机房的静态带宽来提供服务。究其原因主要还是BGP带宽的成本比较高,中小企业根本没有人力与财力与大运营商在多个城市做BGP接入。

anycast在国外的应用其实在几年前也不多,主要的应用范围还是在DNS这类使用UDP的无状态的业务上。因此之前国外使用Anycast的场景主要是以下几种:
1. 各厂商承建的13组 ROOT DNS server。
2. 各DNS GTLD Server。
3. 国外的互联网巨头(Google,facebook,MS,Akamai,Amazon)的DNS server
4. 国外流行的DNS服务厂商,比如NSone,DYN之类的
5. 国外的新兴CDN厂商(微软Azure、Cloudflare、MaxCDN等)的Cache server。

国内使用anycast的主要场景:
1. BAT的这类有数十个IDC以上的公司的内部基础服务。
2. 各运营商内部的DNS的跨城部署(绝大部分是各省份内部)

总结一下,之前绝大部分anycast都是用在UDP的业务,少量CDN公司的Cache 节点使用了Anycast。

TCP业务的Anycast实施难点

从anycast的RFC内可以看到,只推荐使用anycast应用在无状态的业务上。对于HTTP之类的使用TCP的业务都不推荐部署。
主要是在IP报文在被路由转发时,当存在ECMP(等价路由)的时候只是机械的按每个IP包随机丢到多个下一跳中的一跳,可能导致TCP连接都无法建立。
一般情况下公网上的路由,只有宣告方触发或者中途链路异常时才会做变化,对于常规的非长连接业务其实都是无影响的。

TCP 业务实施Anycast的关键因素

这两年,随着移动业务的快速发展,各手机APP都在不断优化自己的使用体验。因为国内之前长期大量移动网络用户还停留在2/3G网络,无线业务的网络条件查,通过传统的DNS查询几十个域名对用户体验影响巨大。慢慢地大家开都搞起了HTTPDNS,绕过ISP的DNS,走HTTP批量做域名的查询。
然后大家又发现鸡生蛋 蛋生鸡的问题出来了,HTTPDNS自己的访问绕不过DNS。因此这两年腾讯、阿里云提供的HTTPDNS又开始把服务地址改成Anycast地址了。
这也算是国内第一批有状态业务的Anycast部署。TCP业务部署Anycast的参考几方面:
1. 自己是否具备BGP网络。
2. 自己使用真的有那么高的业务要求、或者是不想走DNS。
3. 多点宣告后广域网内各地是否稳定优选到”就近点“(一般情况下BGP路由在各地优选是固定就行)。
4. 接入层的交换机能支持一致性hash(一般是根据源IP/源端口/目标IP/目标端口/协议做hash,目前入门的3层交换机都支持)。
5. 单个业务的request/response时间,一般HTTP请求的业务都是适用的,相反一些push类的长连接业务不适用。
6. 各区域是否在大部分时候路由到固定节点,这块有论文做过研究,大部分anycast CDN的路由在几个月维护时才动一次,然后恢复原状。

发表在 net | 留下评论